Index
IntroductionHow to construct a plan
The standard rover leave
A real-world example
Dealing with deadness
The killer leave
More killer tricks
Better late than never
Copyright notice
How to construct a plan
Scenario
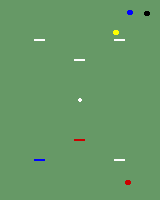
You have a four-ball break with blue, while black is for #3 and has no deadness.
You may make up your own story as to how you got into such a commanding position. If you’re feeling heroic, then say you attacked with black at the start of the game, and have since peeled black and picked up yellow from Corner I. If you’re feeling lucky, then say your opponent stuffed #2 with yellow while you were joined up on the boundary, thus giving you an easy four-ball break.
How are you going to leave the balls at the end of this turn?
Making an outline
You should have a rough plan for the leave from the start of the break. First you need to decide how far to take this break. Will you continue all the way through rover, or stop earlier? If you think you have any chance of taking black all the way around on your next turn, then take blue through rover with this break. You may lose a few games by being pegged out, but you should win many more games by scoring 26 points. Another advantage of going through rover is that you can easily make the very strong leave described in Example 2.
What you should almost never do is stop after penult. The rover peel is easy enough that if your opponent gets in you will probably be pegged out anyway. At the same time, you only make your second break more difficult, as illustrated (and broadcast on ESPN) in the 1994 USCA Nationals singles and doubles finals. In both of these games, the side that won the opening took the first break to rover, and then failed the rover peel on the second break. And in both games, the opposing side mounted a comeback to win 26-25.
Stopping after 4-back will deter all but the strongest players from pegging you out, so the best options are to stop then or go to the peg. Decide on your stopping point as soon as you have the break under control, because there are a few simple things you can do now in preparation for making the leave. Stopping after 4-back is particularly well-suited to this example, where black is clean and for #3, because an effective leave will be quite easy to make.
Constructing the sequence
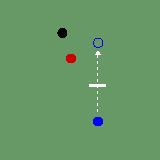
A good way to plan the leave is to picture how you want the balls positioned at the end of the turn, and then work out the sequence in reverse. So how do you want the leave to look? Of course you must leave a ball, either yellow or blue, at black’s wicket (#3). Black should be nearby, with a short roquet on another ball (yellow or blue, depending on which ball you leave at #3). Red must not have any short shots at other balls, so you want to leave it toward the south end of the court. To make the leave even better, red should be wired from the ball at #3, and open on one or both of the other two balls, which are within a yard or two of the north boundary.

|
The leave you are aiming for. Red, which plays next, is open on blue and black but wired from yellow. Blue is for penult, black is for #3. |
From this ideal end-point look backwards step-by-step. To end the turn with no deadness on blue, you need to arrange the other balls in their final positions before running 4-back. You want black near the boundary, so you should make 4-back off yellow. Yellow will then be perfectly positioned as the pioneer for your next turn.
So here is one element you can plan for early on in this turn—you want to use yellow as the 4-back pioneer. The best way to ensure this is to make every even-numbered wicket off yellow. If you make #2 off yellow, then in the usual course of the break yellow will be the pioneer at #4, #6, 2-back, and finally at 4-back.
If yellow is the pivot ball or the pioneer at odd-numbered wickets, you will need to make a swap. Some good opportunities for the swap are after #3 (sending yellow to #6), after #5 (sending it to 2-back), or after 1-back (sending it directly to 4-back).
Before scoring 4-back you must get black near the north boundary. To do this you can either rush it there and take off to yellow, or you can play a split shot. The rush is dangerous unless it is a very short one, as you might rush black off the court. So you plan to use a split shot. To make this shot as easy and safe as possible, you want black to be quite close to yellow, allowing you to use a short croquet stroke to send black toward the boundary. There are two ways to set this up, either by double-loading 4-back or by rushing black to 4-back after scoring 3-back. I like the latter method because it gives you more control over where to leave red, and because it avoids the full-court take-off to 4-back.
So you plan to rush black upcourt after scoring 3-back. This is also when you need to place red in its final position. You accomplish both by double-loading 3-back with black and red. Then after scoring 3-back, roquet red first, then croquet it to its final destination. Use that croquet stroke to get an upcourt rush on black.
To do the double-loading, after you score 2-back, send yellow to 4-back, and then rush (or, if necessary, roll) the pivot ball to 3-back. It doesn’t matter which ball (black or red) is the pivot and which is the 3-back pioneer.
Where to leave red? Anywhere in the south end of the court will be adequate. Sending it toward Corner I will maximize the length of red’s shot, and may also make it easier to wire red from yellow at #3, with the peg and #1 acting as additional obstacles to red’s shot. However, to send red there after 3-back requires a big croquet stroke, making it harder to get an accurate upcourt rush on black. If instead you put red a yard or two directly south of 3-back, you can use short, accurate strokes to easily get the rush on black, while at the same time the 3-back wicket will help you to wire red from yellow. (If red happens to be for 3-back, then you can send it toward Corner I.)

|
How the double-loading at 3-back might look. Blue runs the wicket as shown. |

|
Then after roqueting red, a small stop-shot sends red south of the wicket, while positioning blue for an upcourt rush on black. |
Putting the plan into action
Now you have a complete plan for this turn. Early on, make sure that yellow is the pioneer at even-numbered wickets, swapping balls if necessary. Continue with a normal four-ball break until after 2-back. Double-load 3-back, placing red where you can roquet it first after scoring the wicket. After scoring 3-back roquet red, then croquet it just south of 3-back, at the same time getting an upcourt rush on black. Rush black to near 4-back, then split it toward the north boundary while blue goes to yellow. Roquet yellow and split it to a position that is hidden from red, then score the wicket. Return to black on the continuation stroke. (If red has an open shot on yellow, you may want to take the deadness on yellow to get the wiring right.)
If all goes according to plan you will have made a very good leave, good enough to practically force red to play defensively into Corner I. Which is why you should have gone to the peg with blue. Now instead of a simple three-ball break for black, you’ll have to dig red out of the corner and make yet another leave so that you can finish the game with blue.
The other drawback to stopping after 4-back is that the leave just described only works well in this particular case. If black is for a different wicket or has significant deadness, then stopping early will usually result in a less effective leave.
Copyright notice
Copyright 2001–2008 by Jeff Soo.
12 February 2001