Index
IntroductionHow to construct a plan
The standard rover leave
A real-world example
Dealing with deadness
The killer leave
More killer tricks
Better late than never
Copyright notice
The standard rover leave
Scenario
You are running a four-ball break with blue. Black is for #4, with no deadness. Having learned your lesson, this time you are going all the way to the peg. The ideal leave will be to have red near Corner II, yellow at #4 where it is hidden from red, and black and blue close to the boundary, near #4. Of course you must leave red an open shot on black or blue, or both. You want to end the turn with blue clear, and last-dead on an opponent ball. [As a rover ball, you almost never deliberately go last-dead on partner!] So you plan to end blue’s turn by roqueting yellow, hiding it from red, clearing by shooting through #4 (in either direction), then returning to black near the boundary.
To do this you need yellow near #4 before you score rover. After scoring rover, rush black to near yellow, split black toward the boundary, then roquet yellow, etc. Obviously, you do not want to use yellow as the rover pioneer.
You want to get a close rush on black after scoring rover, so that you can safely rush it near yellow. The best way to be sure of getting a particular rush after scoring a wicket is to double-load the wicket. So put both black and red at rover, with red positioned so that you can roquet it first after scoring the wicket.
When positioning red and black prior to scoring rover, keep in mind that you will be playing a big stop-shot to send red toward Corner II while getting a rush on black toward #4. Red should be positioned a foot or two to the west or northwest of rover, with black a couple of yards north. Then after scoring rover, red is rushed a couple of yards south. Now you are perfectly set to croquet red and get the rush on black.
|
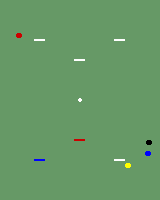
The standard rover leave, when black is for #4. Red is wired from yellow, but open on blue and/or black. Blue and black are a yard or two off the boundary. |
Sequence
As soon as blue’s break is under control, make sure that yellow is not the pioneer at even-numbered wickets, making a swap if necessary. This is an easy way to ensure that yellow will not be the rover pioneer. Continue with an ordinary four-ball break through penult. After scoring penult, send yellow to #4 and double-load rover. Score rover, roquet red, croquet it toward Corner II, while getting a rush on black toward #4. Rush black, then croquet it to a position that is near the boundary and open to red, while blue goes to yellow. Roquet and position yellow so that it is hidden from red, then clear through #4 and return to black.
Resist the temptation to start positioning balls for the leave early in the break. For example, you might be tempted to dump red in Corner II after you score 1-back. Do not do this (unless, for some strange reason, you intend to stop after 3-back). Keep the four-ball break intact until after penult. This will make your break as easy as possible, and still give you plenty of time to arrange the leave.
Summary
Note that the sequence for making this leave is very similar to that described in Case 1. Also note that this sequence will work no matter what wicket black is for. After penult, send yellow to black’s wicket, then double-load rover with red and black.
This, then, is a general method you can use whenever your partner ball has no deadness, or is dead only on the ball that it follows in sequence (e.g., black dead only on red). Run an ordinary four-ball break, making sure that the spent ball will not be the rover pioneer. After penult, send the spent ball to partner’s wicket, then double-load rover with the partner ball and the hot ball. Score rover, roquet the hot ball, croquet it to its final position while getting a rush on the partner ball. Rush partner ball near its wicket, then split it toward the boundary. Roquet the spent ball and position it close to the wicket, hidden from the hot ball. Run the wicket and return to partner. Simple, reliable, and very effective.
For the rest of this article, I will refer to this sequence as the “standard rover leave”.
Pop quiz
Here’s a problem for you to solve on your own. The scenario is the same as above, except that red is alive only on yellow.
When making a leave of course you must be sure not to create a wiring lift for your opponent. If the hot ball is only alive on the spent ball, then you can’t follow your original plan of hiding the spent ball at your partner ball’s wicket. In this case, the ideal leave will differ only in that two of the balls will be transposed. I’ll leave it to you to work out a plan. (Hint: the only change you need to make comes at the very end of the sequence.)
Copyright notice
Copyright 2001–2008 by Jeff Soo.
12 February 2001