Index
IntroductionHow to construct a plan
The standard rover leave
A real-world example
Dealing with deadness
The killer leave
More killer tricks
Better late than never
Copyright notice
Serious deadness
When your partner ball is three-ball dead, of course you want to peel it. But what if you miss the usual opportunities for a peel?
Scenario
Partner (black) three-ball-dead, for #2. Current positions: yellow near 3-back, red three yards west of 2-back, blue ball-in-hand on black in front of 2-back (blue’s wicket).
You were unable to peel black at the start of the break, but have kept the break under control. You got a good rush on red after scoring 1-back, allowing you to pick up yellow in Corner I. It should be easy to get the four-ball break into shape, but you have the tricky problem of a very dead partner ball.
Obviously you must get black into good position at #2 (or even peel it if possible), leaving red at the south end of the court, and blue and yellow arranged so as to give black a three-ball break. As you think of possible ways of attaining this position, beware of any sequence that requires several especially accurate strokes in a row. See if you can come up with your own plan before reading mine.
Sequence
The key to the sequence is positioning (or peeling) black at #2. You’ve already missed the chance for a straight peel when blue was for #2 or a back peel when blue was for 1-back, so you’ll have to come up with something more unusual.
The closest blue’s break comes to #2 is at penult. If you use black as the penult pioneer, then you have a good chance of rushing it near #2 after scoring penult. If you have placed an escape ball at #2, then you will hope to position black with a short croquet stroke, then roquet the escape ball and continue to rover.
If black is to be the penult pioneer, then clearly red will have to be the 4-back pioneer. You should split black so that you can rush it toward Corner I after scoring 2-back, which will allow you to split it to the middle of the court while getting a rush on red toward 3-back (to make the stroke loading 4-back and going to 3-back much easier). After scoring 3-back, yellow is rushed or sent to the middle as a pivot, then black is rushed upcourt and split to penult while blue goes to red at 4-back. Red becomes the rover pioneer, and yellow is sent to #2 as an escape ball while blue goes to penult. (Note: It would be just as easy to make yellow the rover pioneer—you could put it there after 3-back—but red is preferable in case you have to fix black after scoring rover—see below.)
Split black a short distance southwest of the wicket, then run the wicket with control, trying for a rush back to #2. If the rush goes well, you should have an easy split shot to position black. If the rush goes really well you can try to peel black. Don’t attempt the peel unless the position is very easy, because if black bounces off to the side you’ve got problems. Then rush yellow either to the northeast of #2 and take off to rover, or rush yellow to rover (my preference). In either case, score rover, rush or croquet red south, and (if necessary) position yellow at #2 or #3, clearing blue in the process if you get an easy chance to do so. If yellow is at #2, then blue goes to #3, and vice versa.

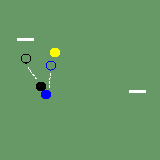
|
The crux of the problem: Blue is about to run penult. Yellow has been positioned as an escape ball at #2. |
|
Blue has rushed black to near #2. Now a nice little croquet stroke puts black in position. Blue will then roquet yellow and proceed to rover, where red is waiting as a pioneer. |
In the event you fail to position black after penult, you have a difficult choice to make before roqueting yellow and proceeding to rover. The best way to be certain of fixing black’s position will be to double-load rover with yellow and red. After you score rover, send red toward Corner I or Corner IV, then rush yellow back to #2. You will then have one more rush and croquet stroke on black to get it into position. Unfortunately, you will then be last-dead on partner.
To avoid that, you can leave yellow at #2 and take off to rover, but then after scoring rover and rushing red south you have a long take-off back to black, which you want to roquet first, and if the take-off is less than perfect you may make matters worse. However, if the take-off is too long or too short, you will probably be able to roquet yellow first, then take off to get a close rush on black. Of course now you’re last dead on partner again, but perhaps this is the best choice. If the take-off from red goes well then you will be last-dead on yellow, and may even be able to clear blue’s deadness.
Plan 9 from outer space
From the starting position, another plan is to send black directly to #2 after scoring 2-back. Then after 3-back yellow is rushed to penult or to near #2, and black is positioned on a short rush. You may even be able to peel black with a thick take-off while blue goes to red at 4-back. An elegant sequence, but one that depends on many accurate strokes in a row. If you fail to get an upcourt rush on yellow after 3-back—a not unlikely occurrence—you will have an ungainly roll stroke to load penult, and will probably have to position black after penult, then take off to rover. The long, thin take-off has many pitfalls. Often the striker’s ball comes up well short. You may send black out of position. Or you may commit a fault, failing to move black.
Beware the plan that requires a string of highly accurate strokes.
Copyright notice
Copyright 2001–2008 by Jeff Soo.
12 February 2001