Index
IntroductionHow to construct a plan
The standard rover leave
A real-world example
Dealing with deadness
The killer leave
More killer tricks
Better late than never
Copyright notice
The killer leave
Scenario
Partner (black) for penult, with no deadness. Blue is running a four-ball break.
You could make the standard rover leave, with red near the south end of the court, yellow hidden at penult, and blue and black near the north boundary. However, in this case you have such an easy play to finish the game that your opponent is almost certain to shoot into the leave, no matter how good you make it. Since red is going to shoot anyway, you should put blue and black right on the nine-inch-line, taking last-deadness on partner to do so.
In a sense you are putting all your eggs into one basket: that red will fail to roquet, and that you will finish the game on the next turn. This is the famous “killer leave”.
Sequence
The key to the leave is getting the wiring right. This will be easiest if you make penult off yellow, then leave it in position after scoring the wicket. So you want to use yellow as the penult pioneer. Double-load penult so that after running the wicket you can position yellow just north of penult with a very short croquet stroke, then rush the extra ball (black or red, it doesn’t matter which) down to rover.
After scoring rover, roquet red and send it to a position wired from yellow, then rush black toward the north boundary. Croquet blue and black out-of-bounds about two feet apart (to avoid leaving a true double target), so that red is open on at least one of them. The best place for red is just to the south of rover, where the rover wicket and the peg will greatly increase the size of the wiring area.
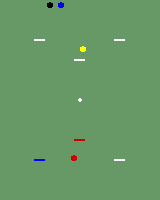
|
The killer leave, when black is for penult. (Blue is a rover, of course.) Red is open on blue and black, but wired from yellow. Blue and black are on the nine-inch-line. Red has no choice but to shoot. |
Implications
Note that this sequence is identical to the standard rover leave, except that yellow is placed more carefully after penult, and that blue and black are rolled out-of-bounds at the end. If you fail to get the wiring right after running rover and placing red, you are perfectly set up to revert to the standard rover leave.
If red is for #5 or rover, send it toward Corner I or Corner IV, otherwise red will try to run the wicket hard, hoping to get to yellow. Although if red were for rover, I would certainly try to peel it through and peg it out.
If red is alive only on yellow, then this leave simply won’t work. Try the variation on the standard rover leave you used in Case 2A, putting black and yellow together near the north boundary, and leaving blue at penult.
If black is dead on red, then be sure to leave blue and black very close together (i.e., almost touching) on the boundary, otherwise red can try to shoot between them. In this case the upcourt rush on black at the end of the turn is especially important.
Pop quiz
Figure out for yourself how to make the Killer Leave when partner is for 4-back and when partner is for rover. (Sometimes, even on a four-ball break, the rover peel just doesn’t work out, and you have to make a leave. Make it a good one. 26-23 is a galling way to lose.)
Playing the odds
Of course you can also use the killer leave earlier in the game, e.g. when your partner is still for #2. This puts a little more pressure on you to finish your second break. Personally I prefer the standard rover leave if my partner ball has more than six wickets or so left. This will usually be enough to convince the opponent to play defensively into a corner, so why take the serious deadness that comes with the killer leave?
As with most situations in croquet, there is no single correct answer.
Copyright notice
Copyright 2001–2008 by Jeff Soo.
12 February 2001